Sunday 4 December 2011

Houndstooth Jumper...finally uploaded!!

Ok...so I know I've taken a huge break from the blog. This is down to a few reasons:
a) I have recently relocated 4000miles away from home and am now living in New York
b) My temporary apartment wasn't really equipped internet-wise for blogging...and I have only just gotten the internet in my new full-time apartment
c) My knitting needles are currently winging their way around the world
d) I am working full-time in my first job since graduating so when I get home I'm really lazy...

So...here is the finished photo of the jumper (or as I am now supposed to call them at work 'sweater' lol)

Basically, I bought some really cheap 100% acrylic yarn from Boyes. For those of you who don't know, it's a really cheap shop that sells basically everything. I wouldn't go there for anything other than the fact they has a ridiculously cheap haberdashery.
The jumper has come out A LOT tighter than I originally intended as I edited the pattern from an old Vogue 1950's pattern where I guess people were a lot smaller then. I had to add a rib section into the sides and sleeves but the sleeves are still slightly tight. I think it may also be down the the fact I have done a pattern and this always makes the tension a little tighter which I didn't think through.

Ultimately, I'm pleased with my first attempt at making a knit pattern so if you fancy making one, please find the pattern below :)

I would suggest that if you need a bigger size, I would increase it along the centre front and centre back...if that makes any sense at all!
Size 8

Needle Size: 5 1/2 mm (US Size 9) and 5 1/2mm circular needles (US size 9)
Tension: 10cm square (4 inch square) 15sts, 22rows

Key: K=knit, P=purl, inc=increase, dec=decrease, SSK=slip, slip, knit, K2tog= knit 2 together

Houndstooth Pattern:
(every block is a stitch)


BACK
Cast on 60sts
Work in 1x1rib for 15rows (K1,P1, K1, P1 etc)
Work in houndstooth pattern and stocking stitch for rest of panel
Work 5 rows.
From Row 6, increase by 1st every 6 rows until Row 60 (70sts)
ARMHOLE SHAPING
SSK twice, K62, K2tog twice (66sts)
Dec by 1st for 13 rows (53sts)
Work 11 rows.
NECK SHAPING
K21, turn.
Cast off 1st at the beginning of every P row until all 21sts are cast off.
Slip 12 sts onto a holder
Cast off 1st at the beginning of every K row until all 21sts are cast off.
Leave the 12sts on the holder and start on the front panel.

FRONT

Cast on 60sts
Work in 1x1rib for 15rows (K1,P1, K1, P1 etc)
Work in houndstooth pattern and stocking stitch for rest of panel
Work 3 rows.
From Row 4, increase by 1st every 4 rows until Row 60 (75sts)
ARMHOLE SHAPING
SSK twice, K67, K2tog twice (71sts)
Dec by 1st for 15rows (56sts)
Work 2 rows.
SHAPE NECK
K22, turn.
Cast off 1st at the beginning of every P row and 1st at the end of every K row until all 22sts are cast off.
Slip 12sts onto holder.
Cast off 1st at the beginning of every K row and 1st at the end of every P row until all 22sts are cast off.
Leave the 12sts on the holder and start on the sleeves.

SLEEVES (Make 2)
Cast on 23sts.
Work in 1x1 rib for 10 rows.
Work in houndstooth pattern and stocking stitch for rest of panel
From Row11, inc by 1st every 5 rows for 99 rows.
Row 100, inc by 1st at the beginning and end of the row (43sts)
Row 101, Cast off 4sts at beginning and end of row (35sts)
Dec by 1st for 5 rows (30sts)
Row 107, Cast off 7sts at beginning and end of row
Cast off.

RIB SIDE PANEL (Make 2)
Cast on 8sts
Work in 1x1 rib for 106cms (41 1/2inches)
Cast off.

Sew entire garment together before making neck rib. Sew shoulder seams first, then sew in the sleeves and then add the side panel to join the front and back together.

NECK RIB
Working with right sides facing outwards and 5 1/2mm circular needle.
Cast on 27sts, slip back sts off the holder onto the circular needle, cast on 57sts, slip front sts off the holder onto the circular needle, cast on 30sts.
Work in 1x1 rib for 10 rows.
Cast off loosely. Sew rib to body.


Let me know if there's any problems!!
Bx

Sunday 7 August 2011

Next Project...a super cute jumper for the cold NYC winter!

You may or may not know that I am moving to New York City in around 6 weeks (argh!) and I am seriously un-prepared for the freezing cold New York winters as this winter in Newcastle has proven! I am really terrible at buying winter clothes because above all else I find that jumpers are seriously over priced because everyone needs them and I am a really fussy shopper because I have been sewing and making my own clothes since I was around 16...I constantly walk around shops saying 'I could make that for cheaper' :/ Now I am able to knit, I thought I'd have a go at making my own jumper!! I know the Topshop AW11/12 look book has been circulating cyber space for sometime but I came across this image on my friend Jenn's blog Venturess and instantly fell in love with the jumper.


I have already worked the repeat for the pattern...took me a couple of hours but it was totally worth it! I found a pattern for it whilst thumbing through the same Vogue knitting book as I found the baby cardigan in, but the pattern is for a much finer knit than I want so I'm going to have to alter the tension which could be a challenge as I have never done it before...

I am also looking out for a suitable yarn as I am the laziest person in the world and I HATE hand washing with a passion so I want it to be machine washable but I am pretty sure that the King Cole yarn I used for the baby project is going to be extremely expensive with the quantity I need...another visit to Ramshambles is in order!

If any one has any yarn suggestions please let me know...I'd appreciate  some guidance!

Bx

Friday 5 August 2011

The Finished Modern Baby Layette :D


All finished! Here are the patterns below, look at older posts for more info and tips :)

Blanket: Stitch Me Softly's 'Baby Snuggle Wrap' 2.5cm Pom Pom


Booties: Bernat's 'Stay On Knit Booties' 1.5cm Pom Pom


Ear-Flap Hat: Petite Purl's 'Cheery Scrap Hat' (for fair isle pattern see 20th July 2011 post) 3cm Pom Pom


Cardigan: 1st August post I crocheted the flower from a pattern in 'Crocheting for Dummies' (great book!!)

I loved every part of this project! Knitting for babies is so rewarding!
Enjoy x

Monday 1 August 2011

The Final Piece...the Cardigan

Man, this has taken me ages! I actually finished it last week but haven't had time to type up the pattern until now! Here is the finished cardigan (minus pom poms as usual!)

 Front
Back

I adapted the pattern from a 1936 Vogue pattern my Mum found. Again, I used the King Cole Super Wash Anti Tickle in cream but I had to buy the smallest size (I still don't understand the weight thing but it knits up on a 3.5mm needle) This is my first typed up knit pattern so here goes!

Yarn: 2 balls
Needles: 3mm US size 11
Tension: 30st 40rows = 10cm

k=knit, p=purl, co=cast on, sts=stitches, dec=decrease, inc=increase

Knits in one piece. Begins at lower edge of back.

Back

Cast on 61st. 

Row 1-13: *k1,p1 30times, k1 (Moss Stitch)
Row 14-50: Stocking Stitch starting with a k row (k on right side, p on wrong side)
Row 51: p30, k1, p30
Row 52: k
Row 53: p29, k3, p29
Row 54: k
Row 55: p28, k5, p28
Row 56: k
Row 57: p27, k7, p27
Row 58: k
Row 59: p26, k9, p26
Row 60: k
Row 61: p25, k11, p25
Row 62: k
Row 63: p24, k13, p24
Row 64: k
Row 65: p23, k15, p23
Row 66: co 41sts, k61
Row 67: co 41st, p22, k17, p55, *k1, p1 four times
Row 68: *p1, k1 four times, k127, *k1, p1 four times
Row 69: *p1, k1 four times, p54, k19, p54, *k1, p1 four times
Row 70: *p1, k1 four times, k127, *k1, p1 four times
Row 71: *p1, k1 four times, p53, k21, p53, *k1, p1 four times
Row 72: *p1, k1 four times, k127, *k1, p1 four times
Row 73: *p1, k1 four times, p42, k43, p42, *k1, p1 four times
Row 74: *p1, k1 four times, k127, *k1, p1 four times

Repeat rows 73&74 four more times

Row 83: *p1, k1 four times, p42, k43, p42, *k1, p1 four times

Shaping the Neck

Row 84: *p1, k1 four times, k61, turn 
Row 85: Cast off 2sts at neck edge, k17, p42, *k1,p1 four times
Row 86: *p1, k1 four times, k to last st, dec 1
Row 87: dec 1, k14, p42, *k1, p1 four times
Row 88: *p1, k1 four times, k to last st, dec 1
Row 89: dec1, k12, p42, *k1, p1 four times
Row 90: *p1, k1 four times, k to the last st, dec 1 (62sts) 
Row 91: k11, p42, *k1, p1 four times
Row 92: *p1, k1 four times, k to the end
Row 93: k11, p42, *k1, p1 four times
Row 94: *p1, k1 four times, k to the end
Row 95: k11, p42, *k1, p1 four times
Row 96: *p1, k1 four times, k to last st, inc 1
Row 97: co 2sts, k13, p42, *k1, p1 four times
Row 98: *p1, k1 four times, k56
Row 99: co 13st, k15, p42, *k1,p1 four times (78sts)
Row 100: *p1, k1 four times, k57, *k1, p1 six times, k1
Row 101: *p1, k1 six times, p1, k15, p42, *k1, p1 four times

Repeat rows 100&101 eleven times

Row 124: Cast off 41sts, k25, *p1, k1 six times (37sts)
Row 125: *k1, p1 five times, k1, p26
Row 126: k27, *p1, k1 five times
Row 127: *k1, p1 four times, k1, p28
Row 128: k28, *p1, k1 four times, p1

Repeat rows 127&128 23times

Work the next 13 rows in Moss Stitch making sure the existing Moss Stitch is worked from to ensure the pattern is correct.
Cast Off.

Either rejoin the yarn to the next group of stitches or cut the yarn (leaving a long enough tail) and continue with the stitches that have not yet been worked.

Cast Off 5 stitches at the neck edge loosely and complete this side to match the finished side, reversing shapings.

Making Up

Gently steam the finished piece. Work a row of double crochet around the neck edge and fasten off.
Sew up the side seams.
Where the Moss Stitch at the centre front slants, turn back the neck edges to match and sew.
Crochet a 25st chain just underneath the turn back leaving a long tail when fastening off for pom poms. (See picture below for close up of neckline)


I really hope this is clear! Any problems please let me know!!

Wednesday 20 July 2011

Booties and Hat...I'm flying through this now!

For both the booties and the hat I have continued to use the King Cole Super Wash Anti-Tickle as it comes in so many thicknesses and is perfect for babies so I can keep my layette all looking the same!!

The booties were so fast I couldn't believe it!! About 2 hours per bootie tops!
I followed this pattern-Bernat Stay-On Knit Booties, which on first glance looked kind of complicated but really wasn't! The only bit I was a bit baffled by was the "turn" instruction as I have never come across this before but I followed my instincts and turned my needles around half way down the row and that must have been the right thing to do because they have turned out fab! The only other bit of advice I would give is that when I was working the top section I cut the yarn after an inch and then continued with the same yarn for the next inch and a half to remind myself where to stop stitching on the inside of the bootie and start sewing on the other side so that the stitches don't show when its turned over (see picture below)


For the bows on the front, I used some of the left over chunky yarn from the blanket and did 2 20st chains with the same crochet needle I used for the blanket...waste not want not! I'm going to add pom poms to the bottom of the bows...hence the long tails! We have just found out they are having a little girl so I need to start getting on with them now!

I only used around half the ball of yarn on the booties so I used the remainder of it on this hat:


The pattern I started from was this pattern - Cheery Scrap Hat and followed the newborn measurement, but I made an executive decision to change the way that the ties were done as I was concerned about the length of them and therefore the safety of the baby. I instead used the last of the chunky yarn and crocheted 2 10st chains and put them onto separate double point needles. I then cast on one stitch, knit the crochet stitch and then cast on another stitch so that I had could follow the pattern from the stage where she picks up 3 stitches from her ties (I hope that makes sense...you'll probably understand more once you've read the pattern). I also thought it would help the layette look more like a set with everything having crochet ties and pom poms on.
I then worked the hat up until the point where she starts her fair isle...I loved the boys pattern but I wasn't so keen on the girls pattern so I designed my own!


I then just continued with the pattern from there, making sure I remembered to knit 9 rows of plain knit after I had finished my pattern as the original pattern was 26 rows high and mine is only 17 rows. 

This pattern was more difficult than the previous two and took me around a day to knit...again the long tails are for pom poms haha. Also, this garment won't be able to be washed...major error on my part for choosing a contrast yarn that can't be machine washed (I used a Wendy Allegra incase you were wondering!) I am using this yarn for the pom poms still as I don't think it will matter so much if they felt or shrink and I can't see the baby fitting in the hat long enough for it to ever need washing so I'm not going to worry too much...

I have started the cardigan...but it is taking FOREVER as it is knitted on 3 1/2 mm needles! I'm using a 1930's vogue knitting pattern but I've made a fair few changes to try and modernise it and make it sit well with the other items so it could be a while until the next write up.

Ciao for now!!

Wednesday 13 July 2011

Baby Blanket Notes and Photos

Ok, I finished the blanket a couple of days ago but I've been working so it's taken me until now to write it up! I would say I'm an average speed knitter and it took me a good 3 days.

(I'm waiting to find out if it's a boy or a girl before I add the pom pom to the fastening!)

I got the pattern from another blogger Stitch Me Softly-Baby Snuggle Wrap. The pattern was really straight forward, usually when I'm following patterns off the internet I find myself a some stage going 'eh?!' so that was great!

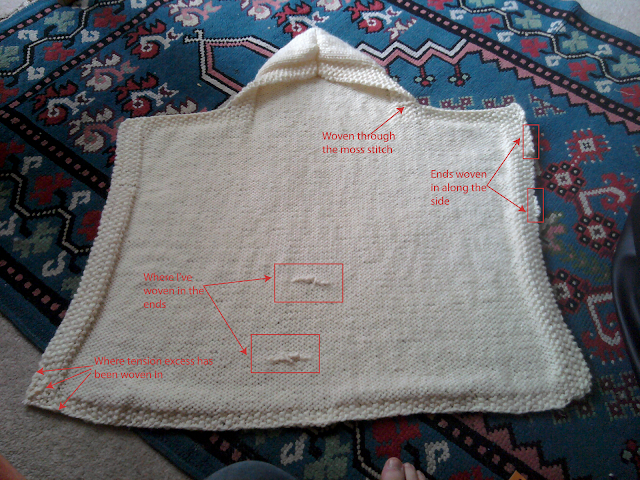
As mentioned in the first post, I used a 100% wool Chunky King Cole Super Wash, Anti-Tickle yarn instead of the recommended alpaca yarn as I want the item to be machine-washable and baby friendly! This did cause an issue with the initial tension as the needles suggested by the pattern are 7mm and the needles suggested on the yarn are 6mm. I ended up having to do the first row as a knit row, instead of in the moss stitch and controlling the tension on every stitch (real pain :/ ). I was also left with a good 15cm tail at the end of the row. I was fairly concerned that I might have to start again but the tension was absolutely fine from then on so I tied a knot in the tail next to the knitting, cut the folded over end to leave me with 3 strands and then weaved them in (see picture below).

The only other problem I had was learning when to start the new ball of wool, the blanket is deceptively wide! The woven in ends look really messy so I would suggest that when you get to the end of a row and have around 1m50 left of your wool, start a new ball and the ends will be woven into the edge (see picture below).


I'm super happy with the results and will be following more of this knitters patterns in the near future...thanks Stitch Me Softly!

Booties next...can't wait to start them!

Saturday 9 July 2011

Modern Baby Layettes...why do these not exist!!!

Ok, so I recently found out that someone I know is having a baby (yey!) and I have always wanted to knit a layette not that I have acquired the basic skills that I need to knit a garment, so I set about searching the internet for a suitable project.

Problem: the couple in question are in their 20's and are into the high street and labels side of life. Try typing in 'baby layette' into any search engine and all you find is super crafty, home-made looking designs, not that there is anything wrong with that but this would totally not work for the a-for mentioned couple.

So, I have set to work finding a suitable pattern for each of the key components (blanket, hat, booties and a cardigan) So far I have only been successful in finding a blanket project and the booties. As of yet, we don't know wether the baby is a boy or girl so I have decided on a cream base wool so that I can get started.

Problem 2: What yarn do you buy for a baby?! All they do is poo, puke and pee so it needs to be machine washable. It also needs to be 100% natural fibres for their skin and not malt too much so it doesn't get in their eyes/mouth/nose. I know alpaca is super soft and really fashionable right now but it is seriously impractical for the above reasons...so what do you use?

After days (and I mean DAYS) of searching the internet (again) I went and visited my local wool shop Ramshambles, York. The guys in there are so helpful and pointed my in the direction of King Cole. They do a range of Anti-Tickle, Super Wash (mashine washable at up to 40 degrees :D) 100% wool. It comes in loads of colours and different weights and so its perfect for my layette!!

So, the blanket is started...I've hit a few snags already so once it's finished I'll be back to give you the low-down!!